How to Start a Blog in 2022 (A Step-by-Step Guide)
Starting a blog means having moments of pure happiness (like when you have your first sale) and moments when you want to bang your head against the desk.
Thankfully the good outweighs the bad for almost any blogger. If you manage to create a banging blog, it means you have a constant stream of passive income coming into your bank account.
You can go on to create products, courses, memberships…. anything really! It is without a doubt becoming a lucrative business to make your mark in.
The concept of working at home after quitting your job with that awful boss is actually a very realistic dream.
Back in 1999, there were only 23 blogs on the internet. Today, there are over 505 million blogs on the internet. According to Statista, there are over 28 million blogs in just the United States.
Blogging is becoming a profession. Simple as that.
Some of the links below are affiliate links which means I may earn a commission if you make a purchase through them. You can read my full disclosure here.
Before we get started, in case you are curious, this is what led me to start a blog:
I have always wanted to have the ability to work and travel at the same time. Having two weeks of paid leave in an entire year is a depressing thought. I spend two months out of this past year traveling across South-East Asia. I was working through it all.
I started this blog after being a freelance writer for years and learning that my friends over in the corporate sector aren’t too pleased with their decision.
It is an easy work-from-home option that works. You can pick a topic that you are passionate about and start your blog. Helping solve other people’s problems could help you solve your own in this case.
I started it because I realized more people need to know that there are other options out there if you are willing to work for it. You can monetize your blog or start a freelance business. Either way, work where you want and when you want.

1. Select your blog’s name
Quick Tip: If you have already narrowed down on a domain name (collectingcents.com, for example, is a domain name), you can skip on down to the next step.
In this step, I am going to discuss selecting a blog name and I am also going to touch upon selecting a hosting company.
The importance of a blog name
Your domain name is literally the first thing people are going to see. That includes every social media post, every mention, and every time someone visits your website.
It is right there-in bold, on the top left-hand side corner. Think through it!
Having a catchy blog name is the first step to a successful blogging career. Remember that you are creating a brand here, you are naming your company.
This is going to be the name of your blog for its hopefully very long lifetime.
How to Choose a Good Blog Name (And Not Regret It)
Here are some questions you should ask yourself when you are naming your new blog:
- What is the audience you are trying to target?
- What is your blog going to be about? What is its niche?
- Does the blog name read well when it is in the URL format?
- Is it easy to remember and easy to spell?
You may come up with something innovative and new but make sure it is catchy and relevant as well. You want to be remembered.
Before you decide upon a domain name, you need to have your niche figured out. For example, my domain name collectingcents would make absolutely no sense if I switched from personal finance to talking about food.
A lot of people decide to name their blog domain using their own name. This can work if your website is a personal blog. It adds credibility and it motivates you to do yourself proud.
If you want to go for something else, you could use one of these blog name generators:
Nameboy

Nameboy is the oldest and most well-known name generator available. It is free, easy-to-use and extremely quick. You simply enter a keyword, for example- finance, and a bunch of creative blog names will come up.
You can try synonyms and different keywords until you find a name that works for you. You will have hundreds of options to choose from.
Once you select a blog name, you click on view details and it will take you to the Bluehost website where you can register for hosting and create your blog with its new name.
Bluehost gives you the WordPress plugin, an SSL certificate, and a free domain name.
IsitWp

IsItWp is pretty similar to Nameboy in most ways. It gives you a variety of options depending on the keyword you enter into the system.
You click Generate Names after you enter in your selected keyword and Voila- you have about a hundred blog names to choose from.
Much like Nameboy, you can try different keywords until you find a name you like.
2. Getting your blog online (selecting your blog hosting platform)
Once you choose your domain name, you are going to need to select a hosting platform for your blog. I (along with many other bloggers) recommend Bluehost as a hosting platform.
What exactly is hosting?
Whenever someone starts a website they need what is known as a server to host it. Consider your hosting company your landlord. They are the help you need to buy your little piece of the internet.
Your host allows the public to access your blog via your URL. Having a good host is important for a couple of reasons:
Uptime, speed, and customer support.
A good hosting company like BlueHost will keep your website online always, come rain or shine. If you go for an unknown hosting company, you are risking a lot since you may have to deal with less than dependable servers.
Second: A good hosting company will help optimize your website which means it will load fast. And finally: customer support.
Any query, doubt, or issue you may have, you need someone who has answers. You need someone you can trust and that comes with a good customer support system.
Should I use blogger.com to create my website?
No. I see so many bloggers making this mistake because blogger is free and that sucks them in. They then pay a very high price later on when they discover it is free for a reason.
For example, blogger will show your blog URL like this: yoursitename.blogspot.com
So, if you plan on making your website a business or monetizing it in any way so that you can, make money off it, you are going to need hosting. Using a hosting company like Bluehost is not something you can save pennies on if you plan on making a blog so that you can make money.
It is also a pretty cheap investment at about $3 a month and you get a free domain name for the first year.
Here are some other reasons why you need proper hosting instead:
- You are going to need to pair up with advertisement companies like Mediavine or become an affiliate for companies if you plan on making money with your blog. Most of these companies will not even approve of you if you are using a blogger based blog. It seems unprofessional and makes their brand look bad for pairing with such a website.
- You are dependent on blogger and your website is not really yours. The best way to explain it is by comparing blogger to renting a house and using a hosting company to buying a house. If you use blogger, your blog is in the hands of another company and can be shut down at their discretion. It is a scary thought. Blogger does not need to give you a warning or even a reason for shutting down your blog. If you own your website by using a hosting platform like Bluehost, you own it. It is yours and no one can take that away from you. Even if the hosting company you use does not want to host it anymore (super rare), you can just switch. It is YOURS to keep and that is so important.
- Google will not really take notice of your blog if it is coming from blogger so the probability of earning money goes down even more.
Here is a list of well-known websites that use a WordPress powered website:
- eBay
- CNN
- NASA
Setting yourself up with a web hosting service
There are tons of web hosting companies you can choose from and I am going to go through the well-known ones below but this tutorial follows setting up an account with Bluehost since that is the one I recommend personally.
You will hear a lot of people harp on about Bluehost and there is a good reason for this. It gives you the WordPress plugin that you need to get your website started, a free domain name for a year, and an SSL certificate.
It is the package you need to get your website off the ground. Bluehost powers 60% of all blogs and offers some of the best deals.
Once you get there, here are the steps you need to follow:
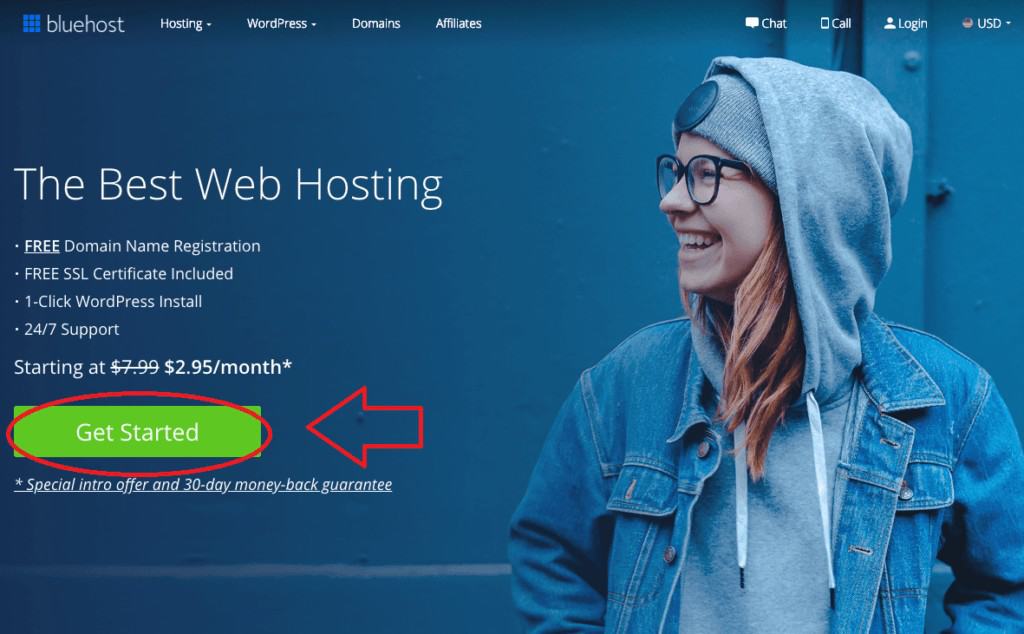
Select your plan
Once you select the Get Started button, you will be taken to the Select Your Plan page.
You can get Bluehost hosting for about $3 a month which is a sweet deal and also what makes it a fan favorite for most bloggers.
The cheapest plan Bluehost offers is $3.95/month or $71.40/year which is a great price and you get everything you could possibly need. You do not have to go for an expensive plan in the beginning because the basic plan should be enough for a new blogger.
You can choose to upgrade to a choice plus or plus plan later on depending on your preferences but the basic plan will be all you need for now.

Select your blog’s domain name
If you are following this tutorial step-by-step, you have already selected a domain name. That is great because the next step is to type in your new domain name and click on the button that says ‘next.’
Bluehost will then check if your requested domain name is available and if it is you will be taken to the next page where you will be prompted to fill in your details.
If your domain name is not available or if you have not selected one yet, Bluehost gives you the option to choose your domain name later.
The pop-up that gives you the option to choose your domain name later will come up if you hover around the page long enough or move your cursor to the top of the page.

Finish creating your Bluehost account
After selecting your domain name, you can move forward to the account information page.
Here is where you enter your name, address, contact number, etc. which is necessary to own your little piece of the internet.

Choose your hosting package
Once you are done entering your account information, you will have to decide what add-ons you want for your package and how you want to pay the hosting cost.
You will first have to select your account plan. You can pay for one, two or three years at a time. If you pay for a longer period of time at once, the cost reduces.
The next step is to select your package extras. Select ONLY the domain privacy extra. The other add-ons are just not necessary.
You will then see the total cost of your hosting plan. Add your payment information and you officially own a little piece of the internet.

3. Other web hosting options
I talked about web hosting in the first point when I mentioned what hosting platform I use. If you have decided to use my Bluehost affiliate link to get your blog started, you can jump straight to point number three.
However, if you do not want to use Bluehost and you have another option in mind, you will need to get that up and running before moving on to the next step.
Why is web hosting so important?
Think of web hosting as the motor to your car. You literally cannot function without it. Yes, you need to invest a bit of money into it but it is your base.
You can also easily make that money back and more by monetizing your website.
Best Alternative Blog Hosting Platforms
If you do not want to go with Bluehost as your web hosting platform, here are some other options:
1. Wix
Wix is best known as a page builder that does NOT use WordPress. So, if you are looking for a drag and drop interface that can build pages and also gives you web hosting, you could consider using Wix. It is a Content Management System as well as a hosting company. Most hosting companies partner with WordPress and use that as their CMS.
Wix is its own Content Management System.
It gives you a domain to use as well and helps you host your website easily with its built-in editor. It also allows you to pay every month which is a plus.
I still recommend Bluehost because I think having a WordPress website gives you more features and WordPress is the industry standard.
The one downside of WordPress is it has a huge learning curve, Wix does not. Wix is definitely more beginner friendly.
So, what I would suggest is if you are using your website for a small business or just a blog of your own, Wix could work. If you plan on growing your website and making it your career, use WordPress.
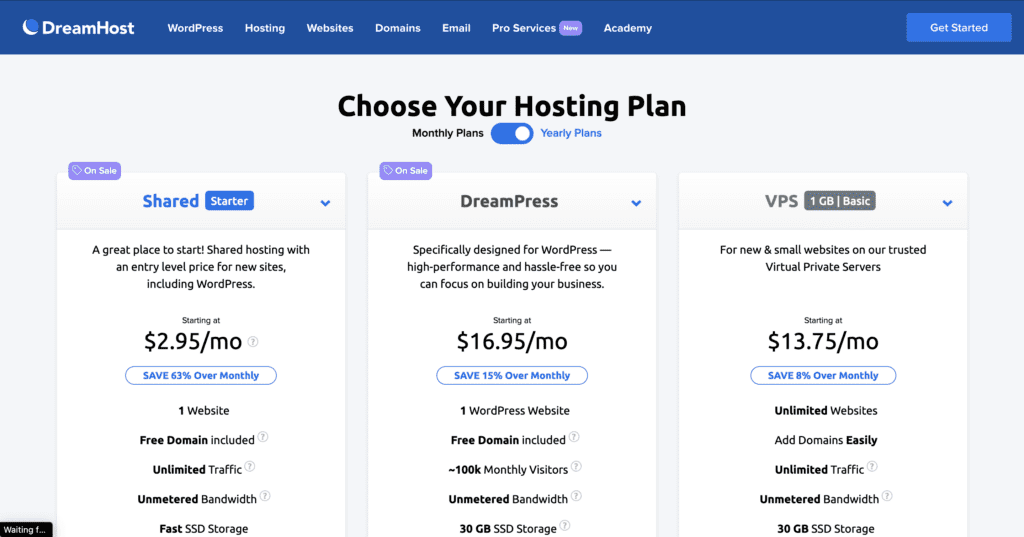
2. Dreamhost
Dreamhost is a lot like Bluehost. It gives you a WordPress plugin, an SSL certificate, and great support. The only difference is it allows you to pay every month. This is great for someone that does not want to pay for a year at a time.
Whatever you wind up choosing, remember that getting your hosting platform set up is one of the most important steps to starting a successful blog.
3. HostGator
HostGator is also a lot like Bluehost. It comes with a free SSL certificate, good support, and a money-back guarantee. This is all pretty similar to Bluehost. There are some key differences though.
HostGator allows you to pay one month, 3 months, or 6 months at a time which I consider to be really great. It gives you more flexibility with regard to payment.
Depending on your needs, think through it and go with what you think will work best for you.
4. Design your blog with WordPress
Okay. So, you have got Bluehost installed and you have set your password. When I go through the rest of this step, I am assuming you have done these things. If you have, you should be looking at this page right now:

Getting WordPress up and running
I absolutely hate it when tutorials end here because this is where you actually need help. I remember when I first created a WordPress blog and the tutorial I was following was like- Boom. You are done.
I was not. I was confused. The theme I choose looked nothing like my website page. I was absolutely lost. It took me about 3 weeks to get a hang on WordPress and understand how it worked. So, my first bit of advice is you need to give yourself time.
What is a WordPress theme? What is a WordPress theme used for?
First of all, here is what a theme is- it is the basic design or layout of your website. How your website is designed. Think of it as the coat of paint on your new car. What do you want it to look like?
Each theme comes with different design and layout which is what makes it special. Certain themes are designed for certain types of websites. So, you could find a portfolio theme for a website that want to be used purely to showcase someone’s portfolio.
A theme can be altered using code or plugins to add certain extra features.
Theme Options You Can Choose From:
You can select a free theme (WordPress has tons) to get started and if you want, you can go back to it later and use a paid theme.
Keep in mind though that free themes do not offer customer support and normally lack any advanced features that you may need later.
A free theme is good for a hobby blog but I would suggest going for a paid option if you plan on monetizing.
- A paid theme allows you to mess around with far more features like landing pages or adding buttons for example.
- Free themes are not unique and they are used by millions so your website is going to look like ‘nothing special’ and you won’t be able to change much with a free theme.
- A free theme does not offer customer support so if something goes wrong, you have no where to turn.
I suggest going for one of Envato’s many theme options to get started.
They are great for beginners and have TONS of options- 11,892 the last time I checked. (This is the paid option)
I put a lot of importance in the design of my website. I think it is extremely important and it is literally the first thing any reader gets to see.
According to Blue Corona, 38% of visitors will stop reading if they think the layout is unattractive.
Also, when conducting a study, Adobe concluded that 59% of visitors will browse through a page that is beautifully designed rather than boring if they only had 15 minutes.
Suffice to say, having a great website that loads fast is going to retain reader and get new ones.
It is easy to get swept away in the excitement and get super confused regarding what theme you should be using.
6 Tips For Choosing The Best WordPress Theme
- Keep it simple: Your landing page does not need to look over the top. A badly designed website is normally one that uses gaudy colors and is over-the-top. Less is more when it comes to design.
- Mobile-friendly: Almost 60% of the internet is browsed through mobile phones. Having a responsive website will help you retain more customers because there is nothing more annoying than a web page that is not optimized to your screen. If you want to know whether your theme is mobile-friendly, simply use the Google mobile-friendly test.
- 24/7 Support: If you are using a free theme, it is extremely doubtful that it is going to come with 24/7 support. Why should it? Who is going to pay the person that responds to your support ticket? This is one of the main reasons I went for a paid theme. You are going to have doubts. It is inevitable. I have been using WordPress for years and I still have doubts. There could also be a bug in the theme you are using and if there is no support, it is going to be hard to find a fix. For example, when Optimize Press (my theme) rolled out its new theme update, my Yoast plugin was not working well with it. I had to send in a support ticket for their team to figure out why my theme was not functioning properly. There was no way I would have known that the problem was because of a plugin I had been using forever.
- Blog Layout: If you aim at using your website to start a blog, make sure you like the blog layout of the theme you are using. Before I signed up for Optimize Press, I made it a point to check out what their blog posts looked like. I read what people were saying about the theme and then only did I sign up for it. I did my research.
- Social Icons: Your WordPress theme should give you the ability to display any social icon you want. A lot of themes give you a very limited amount of social icons and only allow you to place them in certain areas. Those themes have an extremely restrictive layout and you should avoid them at all costs.
- Plug-in issues: Remember what I said about the Yoast plug-in having that issue with my theme? That is pretty common. The only difference is that a lot of the time it is not a bug. The theme and the plug-in may not work together at all. You want a theme that will work in tandem with the plug-ins you will be using. This is super important to keep an eye on because plug-ins are what gives your blog additional functions. Yoast, for example, is the plugin that is used for SEO. There are tons of other plug-ins that give your blog extra functions. I will be listing some of the nicest ones below.
As a new blogger, investing in a paid theme may not be something you are ready to do.
Thankfully, there are some great WordPress themes out there that are free. Here is a list of some of the best free WordPress themes.
If you are willing to invest in a theme (which I strongly recommend doing), you could buy one of the many themes available on Envato.
They are perfect for a beginner because each theme has every feature you could ask for and is highly customizable.
More than anything else, it is simple to use compared to other free themes and you get support to help you with any questions you may have.
If you are still unsure, you can skip that step and go back to it later. No rush! Take your time deciding what theme you want to use
Setting up your dashboard
Once you select a theme, you will be looking at this screen:

Go ahead and select the ‘start building’ button to get to the main WordPress dashboard.
You will be taken to the ‘Welcome to WordPress’ page:

Still with me? Go ahead and customize your WordPress page a bit. As you can see, they are going to ask you whether you want to set up a business or personal website.
Go ahead and select your preference. I would suggest going with personal if the website is meant to be for blogging purposes. Selecting the business option would make sense if you already own one.
Once you are done with that, you will have to type in a site title and description:

After you fill that out and hit the ‘next step’ button, you will be taken to a page that asks you whether you will be featuring blog posts.
Hit on ‘yes’ for that if you plan on having a blog of any kind. Even if you plan on using this as a business website, select yes if you want to post even a few articles from time to time.

Once you select ‘Yes’ you will be taken to a page that asks you to select what sort of homepage you would like. It should look like this:

You should go ahead and select the option on the left: Most recent news and updates. This is a good idea for a new blogger because it means that all of your blog posts will be featured on your homepage.
After this, you will be taken to a page that asks you if you want to build a contact page. It will look like this:
( Select Yes)

Finally, you will be asked whether you want to connect your Jetpack account to WordPress. I suggest saying ‘no thanks’ so you can do this later. I do not personally use the Jetpack plugin because it slowed down my website big time.
Once you are done with this, you will be taken to what is known as the backend of your website. This is where the magic happens. Think of it as the backstage area of a play recital. You are going to be getting everything ready for the big show over here.
This is what it should look like:

As you can see, there is a ‘launch your site’ option right on the top which you can select if you want to take your site live.
You should ideally add some plugins and blog posts before you do that though.
WordPress Terminology
Here is my cheat sheet to understanding WordPress basics now that you have your website up:
- Plug-Ins: If you refer to the image above, you will see a plugins option on the left-hand side panel. Go ahead and select it. You will be able to see all of your plugins and add new ones. Plugins are used to add functionality to your website. There is a plugin for pretty much anything. Some of the plugins I use are Yoast (for SEO), Thirsty Affiliates (to store all of my affiliate links), GDPR Cookie Consent ( for a cookie agreement pop-up- if you do not know what that is, refer to my blogging laws article here), Lightweight Social Icons, Nitropack, Updraft (to back my site up in case of any hacks or crashes), Wordfence (for security), etc.
- Appearance: The Appearance option on the panel will lead you to the page that lets you customize your theme, add widgets, change your menu, etc. It will help you change the way your site looks.
- Posts: You will able to create new blog posts, edit old ones, delete a blog post, etc by going to this area of the panel.
- Pages: You will be able to create your website’s pages from here. Your homepage, contact page, hire me page, etc.
- Settings: This one is pretty self-explanatory. It gives you the ability to change basic settings for your website.
- Media: Add new media, edit something, or delete media that you do not need anymore.
- Comments: Reply to comments on your blog posts and view new ones.
- Widgets: A widget is a block that gives an additional function to the WordPress user. You can add these widgets to your sidebar or footer which are also known as widget-ready areas.
Some basic stuff you should take care of
1. Activating a theme: If you have not already selected a theme, you can do this by going to the Appearance tab on the left-hand side panel and selecting the ‘add new’ button. I suggest going with a paid theme because it is far easier to use and you could get your blog up faster. I suggest using one of Envato’s themes. They have an option for everyone.
If you do decide to go with a paid theme, it will normally come as a zip file. So, you are going to need to go to appearance> themes and select the ‘upload theme’ button and upload the zip file that you have received on purchase. You then go back to the theme page and activate your new theme.
2. Permalinks: A permalink is a static hyperlink that corresponds to a certain page of your website. A permalink is important for Google search rankings. So, for example, in my post 9 Steps to Starting a Freelance Business- One That Brings in Cash, here is what my permalink looks like:

As you can tell, I have chosen to customize my permalink with keywords that I think will help it rank better. You can do this by simply hitting the edit button that I have highlighted above.
WordPress gives you the ability to give your permalink a standard format which is really important for Google rankings. The preferred format that most bloggers go with is:
domain.com/blog-post-name
You can make this your standard format by heading to settings>> permalinks and then selecting the blog post format as I have done below.

3. Adding & creating your main pages: You should create some of your main pages like About, Contact Me, Blog, etc.
You can do this by visiting Pages>> Add New and creating a new page. If you decide to add that page to the main menu of your website, it will show up according to the page name you save it as. Here is an example:

You can add these pages to your main menu by going to Appearances>> Menu and adding the page you want to see in your menu. It should look like this:

You can select the page you want to add and click on the ‘Add to Menu’ button. You can then finish it off by selecting ‘Save Menu.’
4. Create a post: Now you need to start creating blog posts for your website. You can do this by going to Posts>>Add New.

5. Widgets: I have already touched upon what widgets are earlier on in this tutorial. Now I am going to talk about how you can use them. Go to the widgets tab in your WordPress sidebar. You should be on this page:

As you can see, I have added tons of widgets to my sidebar and footer. You can do this as well by simply dragging and dropping the widgets that you would like to see on your sidebar/footer into the respective panel. Scroll up to the top of this blog post and look at my sidebar for an example.
6. Media- What is a blog without amazing pictures? You can add media by going to Media>>Add New and selecting files from your desktop.
7. Email Marketing- If you want to monetize your blog and make it a business, starting an email list is imperative. You can use ConvertKit or Constant Contact as an email marketing software to set up automated email sequences, manage your list of email subscribers, create automation funnels, and communicate with your audience. Here are my over ten ways to grow your email list to get you started.
If you have made it this far, part two of this post breaks down monetizing your website and how you can get started.
| Swagbucks pays you to take surveys online and is one of my favorite survey websites because of its countless survey options and trustworthiness. They pay you via PayPal or gift cards if you take surveys through their website. You also get a $5 welcome bonus using this link. | ||
| CIT Bank offers high yield savings accounts and term CDs that are great for people who are looking to invest their cash and earn interest. One of the reasons they are so famous among savers is because they have one of the nation’s top rates- 6x the national average (your typical savings account earns you just 0.09%). | ||
| FlexJobs is great if you are looking for remote work opportunities. The team at FlexJobs monitors every job posting to make sure the standard is maintained so you will find well-paying job opportunities and zero scammy ones. | ||
| For wise parents with their children’s futures in mind, an early tax-advantaged investment account specifically tailored for children is a fantastic idea. Programs such as UNest are designed to help you achieve this goal of crafting a better future for your children. |
||
| Credit Saint is my top pick when it comes to credit repair agencies. It has a 90-day money-back guarantee, an A+ rating from the BBB, affordable pricing and it has also been voted the best credit repair company by consumer advocate. Credit Saint |